Thursday, October 1, 2020

October 3-D Blog Hop Fall Themes


It is October 1st, so
we’re celebrating with a blog hop! We’re each showcasing a second project we created using a similar theme,  stamp set/or bundle we used in our  3D Bundle Tutorial Bundle Project.

The projects designed for the 3D Tutorial Bundle are totally exclusive and include Imperial and Metric project measurements.  Here is a sneak peek for you.
 

For my additional project, I created a fall card using the punches from the Gilded Autumn Suit and the Autumn Goodness bundle to build this colorful fall scene. 
1. Use a Thick Whisper White card base (A2)
2. Cut out the fence from Crumb Cake and Early Espresso.
3. Stamp the wheelbarrow, pumpkins, and the bunch of wheat with Early Espresso ink. 
4. Use the matching dies and run the stamped items through the Emboss and Cut Machine. Cut the fence in both Crumb Cake and Early Espresso. 


5. Color the stamped images with Stampin' Blends or ink with a water painter. I used Cherry Cobbler, Shaded Spruce, Bronze, Dark Sunflower, and Pumpkin (ink).
6. Start building the scene on your card base. Start with the fences. Glue the two fences together and place on card, allowing for a ground cover of leaves.
7. Add the colored pieces with Dimensionals and stamp All Good Things stamp with Early Espresso.

8. Decorate the inside with a 1 inch piece of Hounds tooth from the Gilded Autumn Designer Paper pack and add leaves of various colors and shapes using the new Autumn Punch Pack. Use the Plant Kindness Stamp with Early Espresso.

All together this is a fun bundle to use! Why don't you give these stamps and dies a try? If you like this project and want to see the 3-D projects, do order the Tutorial Bundle!
 

You have several ways of receiving the 3-D Tutorial Bundle:
1) Order $50 from my onl
ine store between October 1, 2020, and October 31, 2020, and  get the PDF for FREE. https://www.stampinup.com?hostcode=XVXJBHEQ

2. Purchase October's  Tutorial Only 3-D tutorial Bundle (6 tutorials) PDF for $15.00 This is a one-time purchase.  Simply drop me an email at ljbradshaw3@sbcglobal.net,  and I will send you a PayPal Invoice. Once I receive payment,  I will email you the PDF tutorial.

3.  Join my team! They always get the tutorials for free!  Please ask me about it!

*** The November 3-D Blog hop will be on November 10th

Now, make sure you hop along and visit all the designer’s projects for October.  Thanks for hopping by! Be sure to leave me a note!


Check out the Designer Series Paper Sale! 

Tuesday, September 1, 2020

September 3D Blog Hop Magic in This Night Suite


Hello everyone! It’s September and we have another fantastic 3D Bundle for you!  We’re celebrating with a blog hop! We’re each showcasing a second project we created using the same stamp set/or bundle we used in our  3D Bundle Tutorial Bundle Project.
The projects designed for the 3D Tutorial Bundle are totally exclusive and Imperial and Metric project measurements.  Here is a sneak peek for you.
For my additional project I  decorated the new Mini Cup and Mini Carrier using products from Magic in this Night Suite.  

Cut 2 Basic Grey cardstock 2-3/8" X 5-7/8" 
Cut  2 Magic in This Night Suite DSP 2-7/8" X 2-3/8"
Cut 2 Magic in This Night Suite DSP 2-1/8" X 5-5/8
Cut 2 trim pieces from Magic in This Night


Attach the large matted pieces to the front and back of the carrier. The smaller pieces use Tombow to attach to the ends of the carrier.  Tie a bow with 12 inches of the Metallic Ribbon.
Stamp the sentiment on Whisper White paper. Cut out using the matching die. Color using Light Calypso Coral, Dark Pumpkin, and Light Mossy Meadow Stampin' Blend pens.
Since the cups looked empty, I cut out covers for each of the coffee cups using the same DSP. I was able to get it it done with one sheet of 12x12 DSP paper. 


All together this is a fun set to use! Why don't you give it a try? If you like this project and want to see the 3-D projects, do order the Tutorial Bundle!

You have several ways of receiving the 3D Tutorial Bundle:
1) Order $50 from my onl
ine store between September 1, 2020, and September 30,  2020, and  get the PDF for FREE. https://www.stampinup.com?hostcode=ME4P64ZD

 
2) Purchase September's  Tutorial Only 3D tutorial Bundle (6 tutorials) PDF for $15.00 This is a one-time purchase.  Simply drop me an email at ljbradshaw3@sbcglobal.net,  and I will send you a PayPal Invoice. Once I receive payment,  I will email you the PDF tutorial.

3) Join my team! They always get the tutorials for free! There is a special promotion this month if you join my team! Please ask me about it!

 
Now, make sure you hop along and visit all the designer’s projects for September.  Thanks for hopping by! Be sure to leave me a note!


Saturday, August 1, 2020

3D Blog Hop August 2020 Nothing Better Suite


Hello everyone! It’s July, and we have another fantastic 3D Bundle for you!  We’re celebrating with a blog hop! We’re each showcasing a second project we created using the same stamp set/or bundle we used in our  3D Bundle Tutorial Bundle Project.
The projects designed for the 3D Tutorial Bundle are totally exclusive and not available elsewhere online. In addition, you’ll receive both Imperial and Metric project measurements.  Here is a sneak peek for you.


Since I gave you coffee for my 3-D project, I thought I would give you cookies to go along with the coffee. Who doesn't love a good chocolate chip cookie with some java? My card features the  Nothing Better Set with so much whimsy.  How cute is Coffee, Cookies, and Cocktails?
Nothing is difficult but a little time consuming.
1.Randomly stamp the cookies on a 4"X5-1/4 in Whisper White cardstock, leaving some room for the sentiment.
2. Stamp cookies on a separate sheet of Whisper. I stamped the outline in Early Espresso first, and then filled in the cookies  using Crumb Cake. Cut using coordinating die.
3. Attach the cookies randomly to the stamped cookies. Use dimensionals to pop up the cookies.
5. Cut out 3 "cookies" using the die. I cut 2 Night of Navy and 1 Whisper White and layered them as shown. With the Whisper White "cookie" on top, the Night of Navy layers look like shadows showing perspective. I used liquid adhesive, but one could use the new adhesive sheet, now that it is available.

All together this is a fun set to use! Why don't you give it a try? If you like this project and want to see the 3-D projects, do order.

Are you interested in the Tutorial Bundle?
You have several ways of receiving the 3D Tutorial Bundle:
1) Order $50 from my online store (http://craftingcoachlaurie.stampinup.net )between August 1, 2020, and August 31,  2020, and  get the PDF for FREE.
2) Purchase August's   Tutorial Only 3D tutorial Bundle (6 tutorials) PDF for $15.00 This is a one-time purchase.  Simply drop me an email at ljbradshaw3@sbcglobal.net,  and I will send you a PayPal Invoice. Once I receive payment,  I will email you the PDF tutorial.

3) Join my team! They always get the tutorials for free!
Now, make sure you hop along and visit all the designer’s projects for August.  Thanks for hopping by! Be sure to leave me a note!


Friday, July 31, 2020

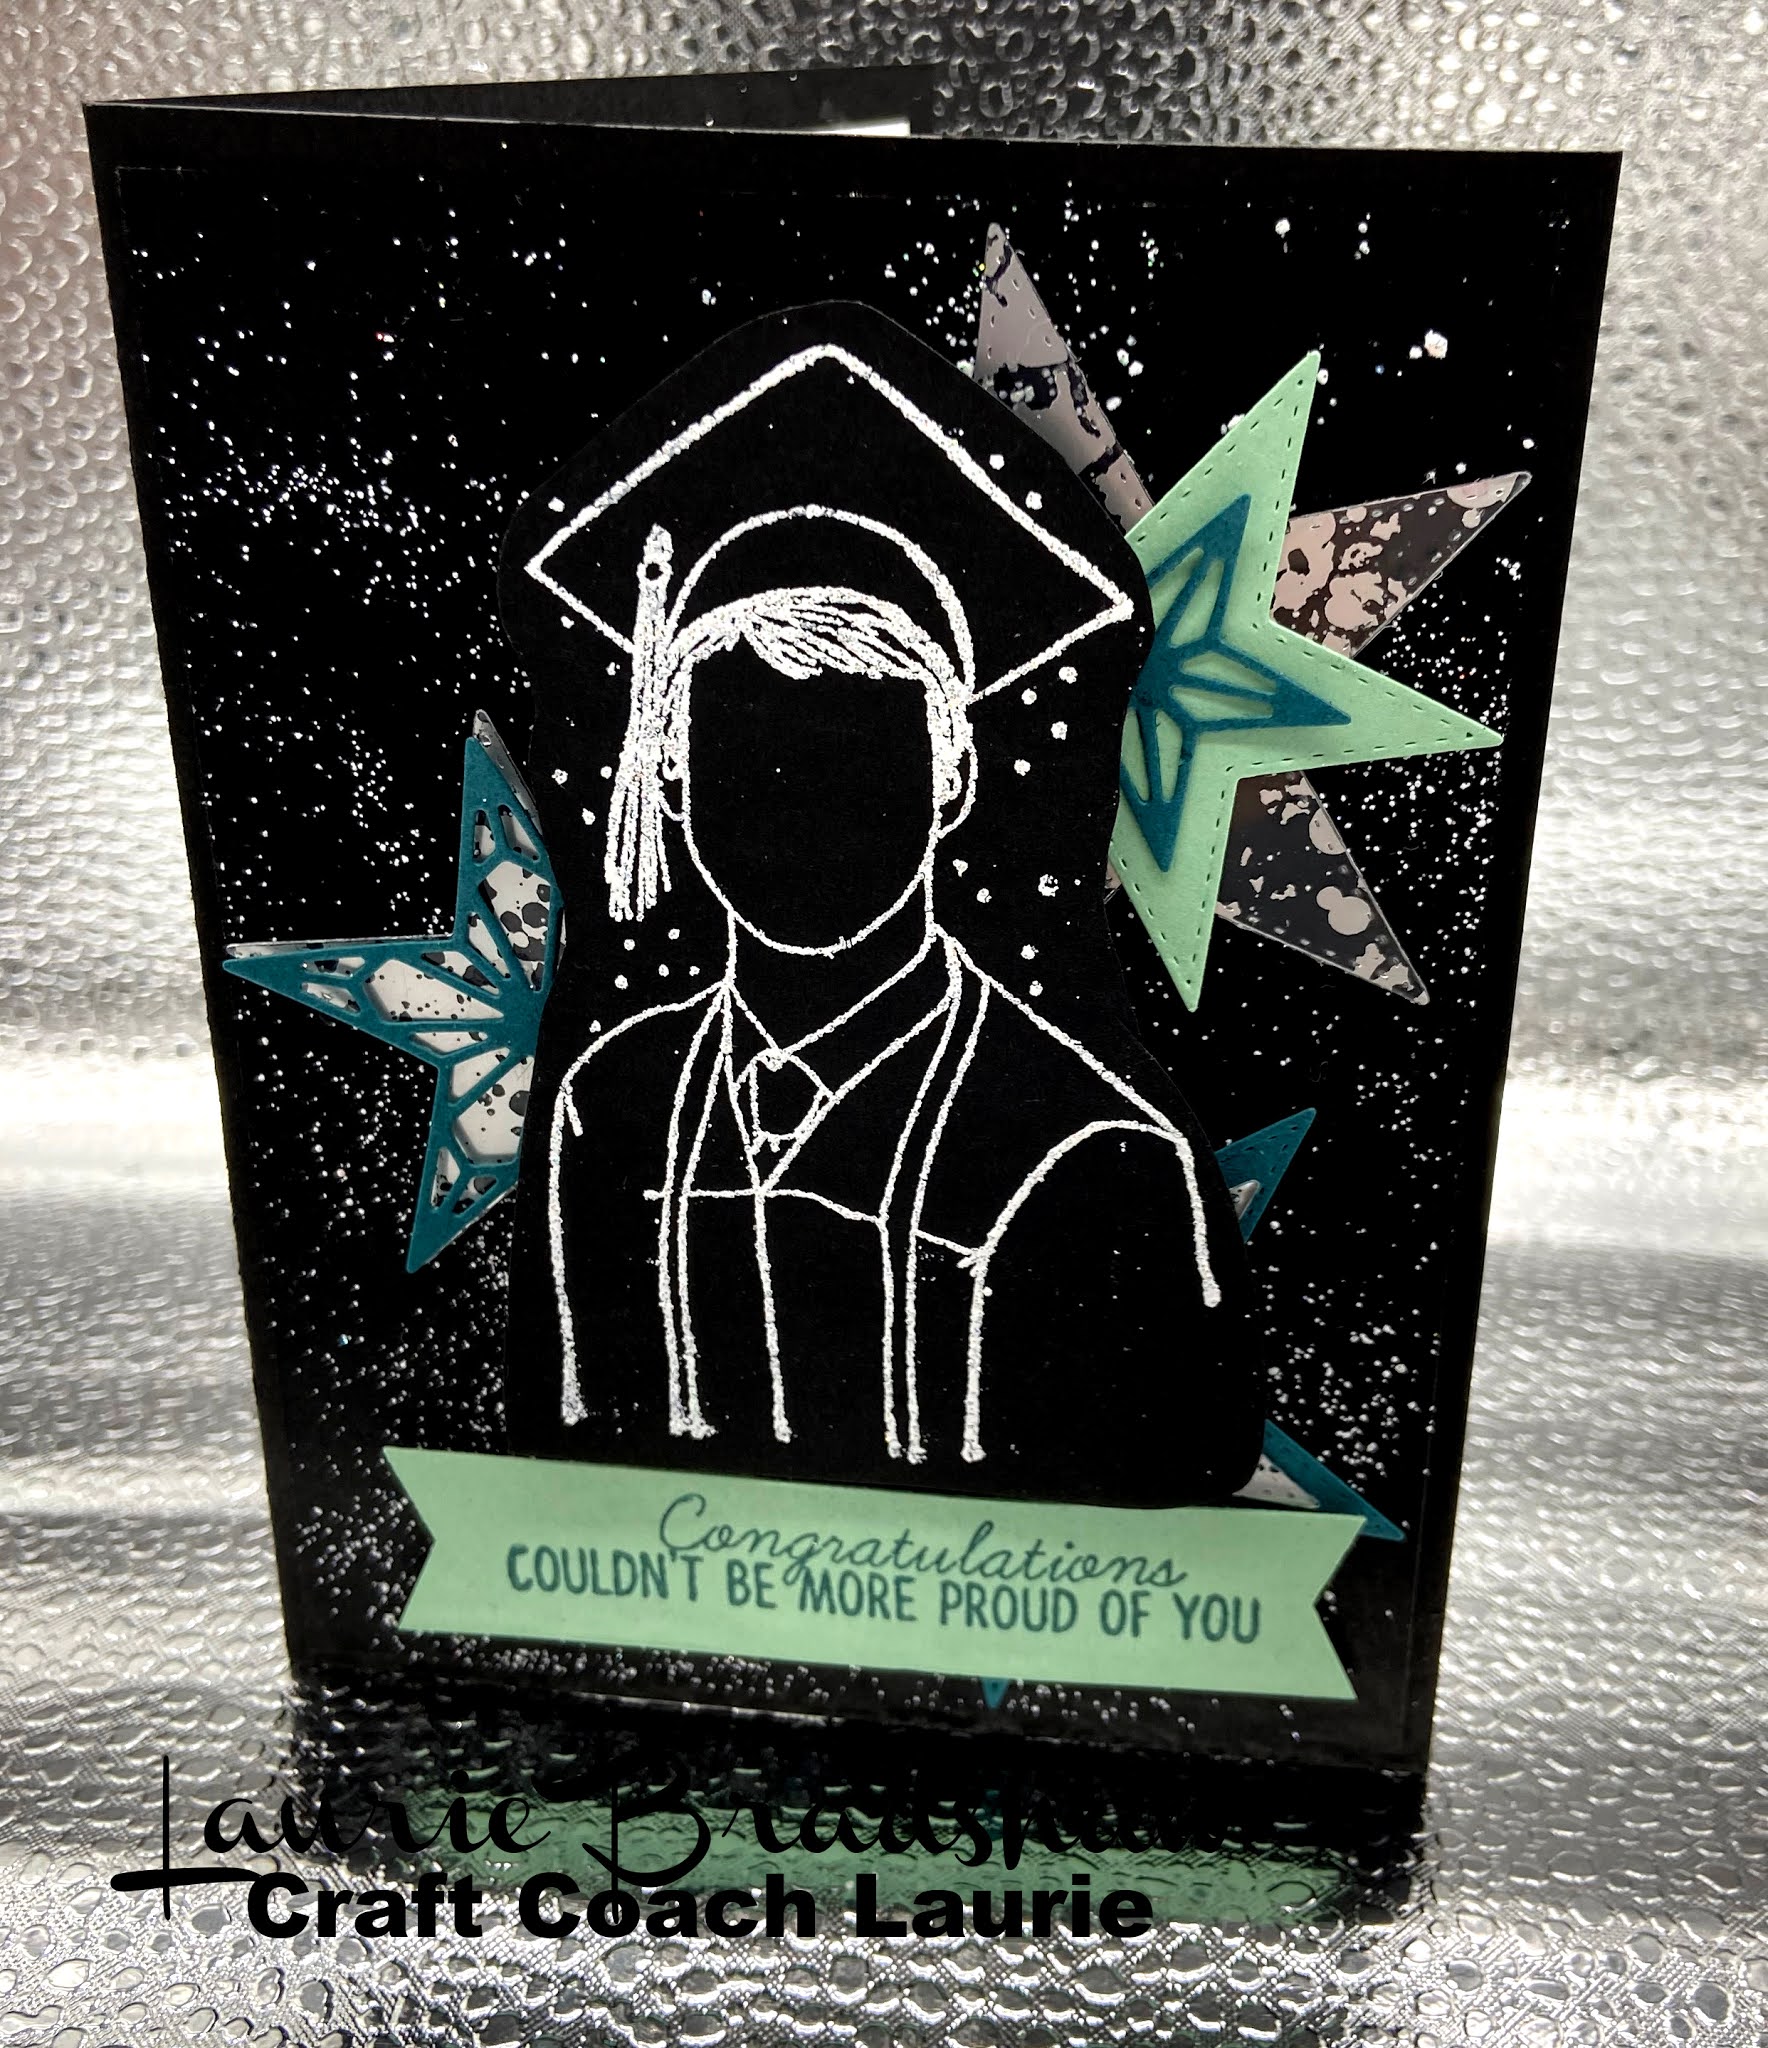
Custom Graduation Card Male (Stitched Stars)


I had fun creating  a custom graduation card for a young fellow going into astronomy. I put the graduate in the stars!  Stampin' Up's Stitched Stars were the dies that I used.  Mint Macaron, and Pretty Peacock were used  for the color palette. I used Versamark on the the entire background and sprinkled embossing powder over the layer, just like Kylie Bertucci recommended the other day. The stamp was from Unity Stamps.

Monday, July 13, 2020

Kylie’s Demonstrator Monthly Blog Hop July 2020 Pampered Pets

Thank you for joining us for our Stampin' Up Demonstrator Monthly Team Blog Hop.We are so happy that you could join us today for this blog hop for ideas and creative inspiration. We are a group of Stampin' Up Demonstrators from around the world that are taking part in training that is helping us to build a successful Stampin' Up business and reach some goals we have set. We appreciate your support!

You may be starting here or have come from another blog; either way you can find the link list at the bottom of this post so that you can see every blog post and idea today.

Today’s card features the Pampered Pets Suite. I made a slider card. I did make a video, but it would not load correctly! I was inspired by Rose Wood’s video on her slider card. This is an easy project to do, and would be very versatile, too. One could use any number of cute characters that Stampin’ Up carries, ie., Zany Zebras!

One uses a standard A-2 card , 4-1/4“x 5-1/2” Crumb Cake base and a 4”x 5-1/4” layer of  the DSP from Pampered Pets. Use the Classic Label Punch to create the slot. Use the punch again to make a slightly wider slot. This will allow for the cute pup to slide smoothly. Take two pennies. Put a dimensional between them. Adhering the pup to the top of the two pennies, insert the pennies in the slot with the pennies flat against the layer of DSP. Attach the cute puppy paper with dimensional to allow the pup to slide across the opening. The doggy will spin all the way down the track! 
My dog loving friends with birthdays last week both loved their card! I bet you would, too! I hope you try this technique! https://youtu.be/iOaKNUcXKwY

Thank you so much much for coming by today!  Be sure to leave me a note that you came by!
We have an amazing line up of Stampin' Up demonstrators from around the world, and we know you are going to love all of the amazing projects that you are going to see today. Don't miss one blog link. Remember you are currently on my page, Laurie Bradshaw; see who is below me to know where to go next.


Blog Hop List


Wednesday, July 1, 2020

July 2020 3D Bundle Blog Hop and Bonus Days

July 2020 3D Bundle Blog Hop

Hello everyone! It’s July, and we have another fantastic 3D Bundle for you!  We’re celebrating with a blog hop! We’re each showcasing a second project we created using the same stamp set/or bundle we used in our  3D Bundle Tutorial Bundle Project.
The projects designed for the 3D Tutorial Bundle are totally exclusive and not available elsewhere online. In addition, you’ll receive both Imperial and Metric project measurements.  Here is a sneak peek for you.


Playful Pets Suite

Here is my extra project from the Playful Pets Suite. This is a Modified Sunburst card. I cut several sizes of rectangles and adhered to the top third of the card. Use the larger triangles to cover more space. Use the smaller triangles to fill in. I did leave some space between each piece so that Real Red mat is visible. Adhere to the Smoky Slate layer, and use adhesive to adhere the Real Red layer and Smokey Slate to the Basic Black A2 card base. 


This is the backside of the card. I used my snips to cut the overhanging triangles.  I then adhered a 2-1/4 Circle punch to cover the pointed triangle area. I popped up the dog that had been die cut from the DSP. I attached a small bow using the Playful Pet Trim Combo.  I used the Lovely Label Pick a Punch for the sentiment. I colored the Elegant Faceted Gems with the Dark Real Red Stampin Blends. Give this adorable card to your favorite dog-loving person!

Are you interested in the Tutorial Bundle?
You have several ways of receiving the 3D Tutorial Bundle:
1) Order $50 from my online store (http://craftingcoachlaurie.stampinup.net )between July  1-31, 2020, and  get the PDF for FREE.
2) Purchase July's  Tutorial Only 3D tutorial Bundle (6 tutorials) PDF for $15.00 This is a one-time purchase.  Simply drop me an email at ljbradshaw3@sbcglobal.net,  and I will send you a PayPal Invoice. Once I receive payment,  I will email you the PDF tutorial.

3) Join my team! They always get the tutorials for free!
Now, make sure you hop along and visit all the designer’s projects for July.  Thanks for hopping by!

Speaking of ordering – the Bonus Days promotion begins today!
What is Bonus Days?  For every $50 you spend 1 July–3 August 2020 (before shipping and tax), you earn a $5 Bonus Days coupon code that can be redeemed 4–31 August 2020.  There is no limit to the number of Bonus Days coupon codes that you can collect so start shopping!  You’ll be able to use the Bonus Days coupon codes for your August-December Mini Catalog orders.
Thanks for stopping by and happy crafting!

Laurie


Gloria Plunkett at Designz by GloriaKurstan Del Rosario at Stamp with KurstanCindee Wilkinson a Just Sponge it
Laurie Bradshaw at Craft Coach Laurie Margaret Knight at Creative Stamping with Margaret  Melanie Hockin at Mels Inky Fingers


Monday, June 15, 2020

Thank you for joining us for our Stampin' Up Demonstrator Monthly Team Blog Hop.We are so happy that you could join us today for this blog hop for ideas and creative inspiration. We are a group of Stampin' Up Demonstrators from around the world that are taking part in training that is helping us to build a successful Stampin' Up business and reach some goals we have set. We appreciate your support!

You may be starting here or have come from another blog; either way you can find the link list at the bottom of this post so that you can see every blog post and idea today.

My most recent creation uses the World of Good Suite of products. This beautiful suite has gorgeous, muted colors perfect for anyone, especially a masculine card.

1. Cut a sheet of Misty Moonlight in half for a 8-1/2 X 5-1/2." Score at 4-1/4."
2. Cut the selected DSP 5-1/4" X 4-1/4."
3. Using Whisper White card stock, cut out a piece  3"X4-1/2." I needed a larger base, but not too big to hid the gorgeous paper with the gold foil!.
4. Cut out several globes for he background on Whispter White. I used both of the globes since I wanted to emphasize the world, and not just one half of the world. Use a sponge and pad and dab the glue from the Fine Tip Glue Pen. It will dry shiny. Adhere in random order all over the Whisper White base. Let dry.
5. Cut the globe stands from the new Brass Foil Paper.  Stamp the North American globe in Misty Moonlight and the European/Asian globe with Early Espresso ink. Attach to the stand with Multipurpose Liquid  Adhesive.
6.Cut a piece of Crumbcake a desired length and width. I used 3/4"X 2-1/2" long. Emboss this piece using the die with lettering.
7. Print desired saying on printer and cut to fit an Early Espresso piece 3/4"X   3-1/2. Adhere with the new Stampin' Seal tape. Cut out both ends using the Lovely Labels Pick-a-Punch.
8. Adhere as shown.

I posted this card  on another group asking for any tips. One tip that I could change right away was having the small globe tucked behind the taller globe and stand. Here is the picture with this change. This allowed the taller globe to appear in foreground.
Thank you so much much for coming by today!  Be sure to leave me a note that you came by!

We have an amazing line up of Stampin' Up demonstrators from around the world, and we know you are going to love all of the amazing projects that you are going to see today. Don't miss one blog link. Remember you are currently on my page, Laurie Bradshaw; see who is below me to know where to go next.

Blog Hop List


  Happy New Year, Crafty Friends! I have created a series of cards with the newly to be released Memories and More Cards and Envelopes and t...