Wednesday, December 18, 2019


 Welcome to the"Tis the Season To Be Hopping" Blog Hop.  You are in for a super fun treat with all the ladies who have joined us for this hop.  Be sure and follow the hop all the way to the end; you don't want to miss any of it!  Whether you are starting the blog hop here at my blog, or have come from the person before me, be sure to click on the person listed under me further down the page to continue your journey through the blog hop.

Here is a quick gift that one can make. This stunning pillow box could hold candy, a gift card, or both! I did make this with Cindee Wilkinson. She is the queen of packaging in my book!


1. Brayer the pillow box with Cherry Cobbler ink. Add ink over the entire box.
2. Cut out the tag from the Christmas Time is Here paper using the medium sized Stitched Nested
Die.
3. Add gold foil trim to each side of the label using the trellis dies in the Christmas Time is Here
bundle.
4. Fussy cut a flower from the same paper used above and attach with dimensionals. \
5. Punch vellum paper using the Leaf Punch and sponge with Delicata ink or ink of choice.
6. Wrap 18 inches of Gold Shimmer Ribbon around the box.
7. Attach banner with the sentiment stamp of choice.
8. Embellish label using the Gold Glitter Enamel Dots.
Christmas Time is Here
Suite Gift Box
Laurie Bradshaw
510-384-0535
ljbradshaw3@sbcglobal.net
http://craftingcoachlaurie.stampinup.net
Images ©

Monday, December 16, 2019

Kylie's Demonstrator Blog Hop December 2019


Dec. 16th, 2019

Thank you for joining us for our Stampin' Up Demonstrator Monthly Team Blog Hop.We are so happy that you could join us today for this blog hop for ideas and creative inspiration. We are a group of Stampin' Up Demonstrators from around the world that are taking part in training that is helping us to build a successful Stampin' Up business and reach some goals we have set. We appreciate your support!

You may be starting here or have come from another blog; either way you can find the link list at the bottom of this post so that you can see every blog post and idea today.
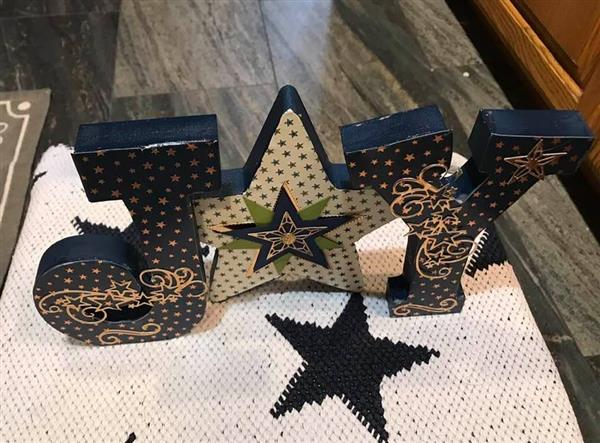


This home decor piece was fun to make and give away. It was well received. So grab the letters from the big box store, and decorate away. There are so many options, as well as color options. I have made sets in blue, green, and red. I was able use items in supply stash, such as retired Stampin' Up paper. No matter the color, the steps are the same.

1. Start with selecting the color palette. Paint the wooden blocks with acrylic paint. Please spend a little more to get better coverage. I tried a cheaper paint, but the more expensive paint delivers a better product.

2. Trace the letters on the Brightly Gleaming Designer Paper. Another suggestion is to turn the letters over, and put on the backside of the paper.   Trace around the letters and cut inside the pen marks.

3. Brush Modge Podge on the front of each letter. Lay on the paper letter, one at a time. Let dry. Modge Podge at least one if not two layers over each letter.

4. Decorate with gold foil  flourishes from the Stitched Stars Dies and attach with Mini Glue Dots.  Stars on the "O" uses a Night of Navy Star,  a Mossy Meadow star, and a decorative gold foil star.  Attach with Mini Glue Dots.

5. Here are some other examples that I made.


This same procedure could be used with other words or letters. My next Modge Podge project will be  OSU for my sister-in-law! She loves the Oaklahoma State University Cowboys and the brightest  orange in the world! I will start with Cajun Craze, Basic Black, and Black Foil!


Thanks you so much much for coming by today!  Be sure to leave me a note that you came by!

We have an amazing line up of Stampin' Up demonstrators from around the world, and we know you are going to love all of the amazing projects that you are going to see today. Don't miss one blog link. Remember you are currently on my page, Laurie Bradshaw,  see who is below me to know where to go next.
 
BLOG HOP LIST 
 

Monday, November 11, 2019

Kylie's Demonstrator Training Blog Hop November Advent/Christmas Countdown Project Kit


November 11, 2019

Thank you for joining us for our Stampin' Up Demonstrator MonthlyTeam Blog Hop.We are so happy that you could join us today for this blog hop for ideas and creative inspiration. We are a group of Stampin' Up Demonstrators from around the world that are taking part in training that is helping us to build a successful Stampin' Up business and reach some goals we have set. We appreciate your support!

You may be starting here or have come from another blog; either way you can find the link list at the bottom of this post so that you can see every blog post and idea today.

Here is the project that I have for you today. This is Craft Coach Laurie's 2nd blog post. Little by little I am getting my toes wet!

Today's project is the Christmas Countdown Project Kit.
This awesome kit went together in less than 2 hours! This is how I started, though.
This very sturdy set comes with everything seen in the above picture. I punched out the numbers and the laid out the pre-cut papers how I wanted the layout. I used a couple decorative stamps to add detail. I adhered the papers with snail. I added the given embellishments and popped up the numbers with dimensionals. I finished off the kit with the Ruched Red Ribbon on the top to complete the look. I then added candy and various Legos from a Lego Advent Calendar to each box. My husband took this to work, and it is sitting in his team's work area until December. Since the Coffin Wreath was such a hit, I decided to send this in for advertisement, plus a well received gesture.They love it! They will have to share and take turns opening each drawer as they count down to Christmas.

***For an extension, one could turn the drawers around and use for counting one's blessing for Thanksgiving, to celebrate one's birthday, or even a count down to a big trip to Disneyland for the kids. Whatever your use, you will have putting this together. Be sure to save your box that it comes in. I am going to save my kit so I can use it for many years to come!

Thanks you so much much for coming by today!  Be sure to leave me a note that you came by!

We have an amazing line up of Stampin' Up demonstrators from around the world, and we know you are going to love all of the amazing projects that you are going to see today. Don't miss one blog link. Remember you are currently on my page, Laurie Bradshaw,  see who is below me to know where to go next.

BLOG HOP LIST


Monday, October 14, 2019

Kylie's Demonstrator Training Blog Hop October 2019 World Card DayAugust 2019 Paper Pumpkin Add-On


October 13, 2019

Thank you for joining us for our Stampin' Up Demonstrator MonthlyTeam Blog Hop.We are so happy that you could join us today for this blog hop for ideas and creative inspiration. We are a group of Stampin' Up Demonstrators from around the world that are taking part in training that is helping us to build a successful Stampin' Up business and reach some goals we have set. We appreciate your support!

You may be starting here or have come from another blog; either way you can find the link list at the bottom of this post so that you can see every blog post and idea today.

Here is the project that I have for you today. This is Craft Coach Laurie's first blog post. This alone is a huge step! This is a new year for my Stampin' Up craft hustle.Thank you in advance for your support as I take this plunge into the blogging world.

Here are a few of the cards created for World Card Day and World Card Sending Week. I used the August 2019 Paper Pumpkin Add-On kit and used A-2 card bases in Pretty Peacock, Crushed Curry, and Crazy Cajin card stock. This fabulous kit gives mats, flowers, foliage, sequins,  and labels along with the stamp set . I added bows, ribbons, and dimensionals  to embellish these Paper Pumpkin Alternatives.
Here is  a close up of this Paper Pumpkin alternative. The other cards were all sent to special folks in my life.

Thanks you so much much for coming by today! We have an amazing line up of Stampin' Up demonstrators from around the world, and we know you are going to love all of the amazing projects that you are going to see today. Don't miss one blog link. Remember you are currently on my page, Laurie Bradshaw,  see who is below me to know where to go next.

BLOG HOP LIST
 

  Happy New Year, Crafty Friends! I have created a series of cards with the newly to be released Memories and More Cards and Envelopes and t...